Posts

Showing posts from March, 2015

GIMP: Resize A Large Photo

Image
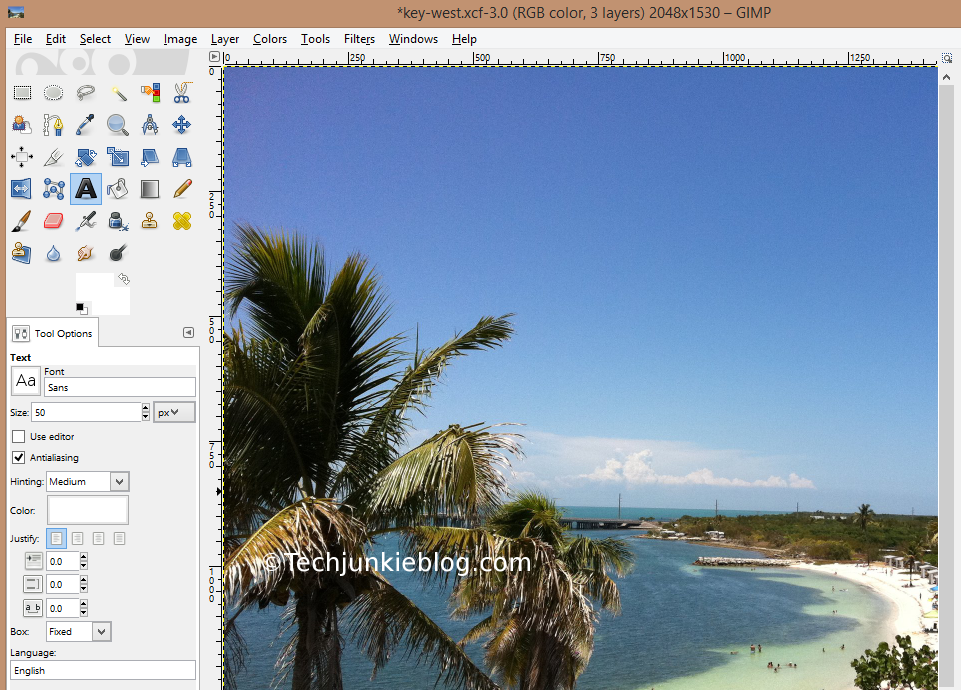
Resizing images is a common task that you have to do to show your photo image on a website.  Most digital camera or smart phones takes photos that are a lot larger than what most web sites can display in it's original size.  In this blog we will show you how to resize your photo in GIMP. Step By Step Instructions: 1.  Open the original photo in GIMP As you can see the photo has the dimension of 2048x1530, not suitable for web display 2. Click Image → Scale Image 3.  The "Scale Image" dialog box will be displayed.  The link icon   puts a constrain on the width and the height to be propositional.  Usually it is the best option, however you need to specify an exact width and height value you can click on the link icon to input your own width and height.  For this blog we will leave the width and height linked. 4.  Type in the new width and height for the image, for this image I am going to type in 600 for the width, the height field will be adjusted automatically to be propo

GIMP Layout : Single Window Mode

Image
Most new users to GIMP gets intimidated with the floating windows that is the default view when you first open GIMP. As you can see it is pretty intimidating, the majority of users sees this interface and runs back to GIMP's more expensive alternatives. Even though GIMP has most of the features of the more expensive softwares.   Most back end developers I encountered would hear good things about GIMP, download the software.  Get all excited about it, then when they first open it, their reaction is what in the world !@#$$$ (NC-17 censored) is this.  They would go back and use paint as their photo editor.  Which is a shame, because GIMP is quite powerful.  However, there's a very easy solution to this UI dilemma and make GIMP more user friendly. Step-By-Step Instructions:  Click → Windows → Single Window Mode  GIMP will dock all the floating windows into a single window, looking like all the other conventional programs that you are used to 3.  The next step is optional, if you fe

C# : Automatically Implemented Properties

There are times when you see a class property without it's private member counterpart and all you see is the {set; get;} accessors. What you are looking at are auto properties that you can create  in C#, the only requirements is that the set; and get; accessors contains no logic.  Usually there are private members that the properties expose to other classes using the get/set accessors, like the code below: public class Product { private int productId; private string name; private string description; private decimal price; public int ProductId { get { return productId; } set { productId = value; } } public string Name { get { return name; } set { name = value; } } public string Description { get { return des

JQuery: Using JQuery CDN Set Up

Image
In this blog I will go over how to set up jQuery for your web pages.  There are two methods to using jQuery.  The first is the use the CDN URLs that are hosted by jQuery, Google, and Microsoft just to name a few.  In this tutorial we will set the CDN from Google.  The process should be the same for jQuery and Microsoft CDNs. Here are the URL for Google's jQuery Library: 1.x snippet:   https://ajax.googleapis.com/ajax/libs/jquery/1.11.2/jquery.min.js 2.x snippet:   https://ajax.googleapis.com/ajax/libs/jquery/2.1.3/jquery.min.js You might be wondering why there are two versions of jQuery 1.x and 2.x, they both use the same APIs and they pretty much mirror each other on a release basis.  The only difference is that the 2.x versions does not support IE 6,7, or 8.  Just to be on the safe side I always use the 1.x versions. So here are the steps to using jQuery in your web page: 1.  First create an HTML5 page markup <!DOCTYPE html> <html lang="en"> <head&

Linux Ubuntu Server: Switching To root User With The sudo Command

Image
Since Ubuntu does not configure the root account by default you have to manually assign root a password before you can use the root account.  However, there's a way to log in as "root" without setting up the "root" password.  The way to do this is to use the "sudo" and "su" command in combination.  The "sudo" elevates your privileges to root like priviledges, while the "su" command is used to switch from one user to another.  So when used together you get to log in as "root". So in your Linux prompt type in the following command sudo su enter the password when asked, after you've entered your password you can run commands as "root"

ASP.NET MVC : Upgrade ASP.NET MVC 4 to ASP.NET MVC 5 Using NuGet Part 1

Image
In this blog we will go over how to upgrade your existing project which uses ASP.NET MVC 4 to ASP.NET MVC 5 using NuGet.  During the upgrade you will encounter some errors but they are easy enough to fix by changing the Web.Config file.  In the first blog we will create a simple ASP.NET MVC 4 application from scratch. But first thing is first let's begin by creating a project in ASP.NET MVC 4: Create a blank solution in Visual Studio call "MVCProjects" 2.  Now add a new project to the "MVCProjects" by selecting ASP.NET MVC4, call it "MyMVC4". Make sure you select Visual C# → Web → Visual Studio 2012 → ASP.NET MVC 4 Web Application, then click "OK" 3. Select the "Empty" template, and "Razor" as the "View Engine", then click "OK" 4. Right click on the "Controller" and select "Add" → "Controller" 5.  On the "Add Controller" screen type "HomeController" on t

ASP.NET MVC : Upgrade ASP.NET MVC 4 to ASP.NET MVC 5 Using NuGet Part 2

Image
In the previous blog  we went over how to create a simple ASP.NET MVC 4 application.  In this blog we will go over the steps to upgrade our ASP.NET MVC 4 application to ASP.NET MVC 5 application. Step-By-Step Instructions: Open the "MyMVC4" project that you've created on the last blog Right click on the project and select "Manage NuGet Packages..." 3.  Select Microsoft ASP.NET MVC and click "Install", as you can see the latest version is 5.2.3 4.  Click "I Accept" on the license agreement screen 5.  There will be a check mark after ASP.NET MVC 5 has been installed by NuGet 6.  Before you click the "Close" button make a note of the "Description" section, pay close attention to the "Dependencies" section, it will come in handy later. 7.  Visual Studio will give you a message that to complete the upgrade you have to restart Visual Studio.  Click "OK" 8.  Close Visual Studio and then open the "MyMVC4&q

Ubuntu Server : Installing Apache Web Server Part 1

Image
Apache (HTTPD) is the most popular web server on the web right now.  It is from the Apache Software Foundation.  A web server serves content to the web.  The power of Apache lies in it's modules which allows you to process scripting languages such as Perl, and PHP. In this blog we will go over how to install the Apache Http Web Server on the Ubuntu Server: 1.  In the terminal type in the following command apt-cache search apache  | more the "search" command searches for the latest apache web server version, we added the "more" command so that we can press enter to scroll as you can see the "Apache HTTP Server" is called "apache2" 2.  Press "q" to get out of "more" listing 3.  Type in the following command to install the apache2 package sudo apt-get install apache2 4.  When asked if you want to continue select "Y" 5. The installation will go on automatically 6.  Once you get your prompt back type in the following

XML In SQL Server Part 1: Storing XML In SQL Server

Image
There times when you have to store data as XML in a SQL Server database table.  In this blog we will go over how to store XML as data in SQL Server.  There's an xml data type in SQL Server that we can use to store XML data. Example: Create a database table that contains a column to store XML data using the xml data type CREATE TABLE Books ( Id INT NOT NULL IDENTITY(1,1) PRIMARY KEY, Book XML NOT NULL ); If you look at the "Book" column for the table "Books" you will see that it has a data type of XML Now that we have our table set up, we can insert XML data to into the table INSERT INTO Books(Book) VALUES( CAST ( '<book> <author>Bill King</author> <title>ACME Consulting: An Inside Look</title> <publisher>ACME Publishing</publisher> <language>Swahili</language> </book>' AS XML)); In the example above we CAST the type to XML first before we insert the data into the Books column becau

T-SQL : WHILE Loop Syntax

WHILE SomeConditionTrue BEGIN -- Execute code here END

T-SQL: IF Conditional Syntax

IF SomeCondition BEGIN -- Execute some code here END ELSE BEGIN -- Execute some code here END Else is optional

JavaScript: Arrays

Once you've graduated from the basic variables in JavaScript the next variable you want to learn is the JavaScript array.  An array is a group of variables in a list or collection.  However, you want to word it.  As with everything else a JavaScript array is mutable, meaning you can change it dynamically while you are working on it. Declaring an Array var alphabet = new Array(); alphabet [0] = 'A'; alphabet [1] = 'B'; alphabet [2] = 'C'; Declaring an Array In Literal Format   var alphabet = ['A','B','C'] Accessing Array Value   document.writeln("First Index: " + alphabet[0]); Output: First Index: A Looping through an Array   for(var i = 0; i < alphabet.length;i++) { document.writeln("index: " + i + " value: " + alphabet[i]); } Output : index: 0 value: A index: 1 value: B index: 2 value: C

JavaScript : Creating JavaScript Objects

JavaScript objects acts differently than objects in the object-oriented programming world. A JavaScript object is mutable meaning it can be changed and is dynamic. Here is how you would create a JavaScript object: var Employee = new Object(); Employee.ID = 1; Employee.FirstName = "Jeff"; Employee.LastName = "Jordan"; You create a new object the new Object() constructor Or you can create a JavaScript object in a literal format var Employee = { ID: 1, FirstName: "Jeff", LastName: "Jordan" }; You can also include a function as a method in your object like the example below var Employee = { ID: 1, FirstName: "Jeff", LastName: "Jordan", displayEmployee: function() { document.writeln("Employee ID: " + this.ID); document.writeln("First Name: " + this.FirstName); document.writeln("Last Name: " + this.LastName);

T-SQL Basics: Variables

T-SQL variables allows you to store and assign values in your T-SQL code.  Variables is a storage unit in programming which allows you to refer back to it at a later time. T-SQL variables have the following characteristics: Local variables must be prefixed @ Global variables must be prefixed with @@ Must be declared with the DECLARE statement Must specify the data type when declared Declaring variables DECLARE @employeeID INT; DECLARE @firstName CHAR(10), @lastName CHAR(20); As you can see from the above example you can declare a single variable or declare multiple variables with a comma separated list. Setting variables SET @employeeID = 1; SET @firstName='Davolio'; SET @lastName='Nancy'; The above example uses the SET statement assign values to the variables one at a time. To assign values to multiple variables with one statement you can use the SELECT statement. SELECT @employeeID=1,@firstName='Dovolio',@lastName='Nancy'; Convert INT

Linux: Find Out Which Shell You Are Using

Image
Start up your Linux machine then do the following: Press Ctrl + Alt + F2 to start a virtual console Login in with your credentials           3.  After logging in type "grep my-username-goes-here /etc/passwd", then you will see which shell environment you are using

log4net : Install log4net on ASP.NET Part 1

Image
log4net is the most commonly used ASP.NET logging package.  It is robust and flexible in it's features.  You can choose to log your errors on the database or in a log file or multiple log files.  However, it is not as straight forward to set up.  In this blog we will go through the steps to install log4net using NuGet Package Manager. 1.  Create an empty web project, and call it whatever you like, below is the settings that I have, then click "OK" 2. Right click on the solution and select "Manage NuGet Packages for Solution..." 3.  Locate the search box on the left hand side 4. Type "log4net" in the search box, the latest log4net version will show up in the search results in the main window.  Click on the "Install" button. 5.  Select the project that you want log4net to be installed, then click "OK" 6.  After the installation under "References" log4net will be added 7.