Posts

Showing posts from July, 2016

Docker : Command to See What Containers Are Running

Image
In our previous blog posts we ran containers with the Fedora and CentOS images.  In this blog we are going to run a command to see which containers are running in our host system.  To get a list of all the containers running on our host Ubuntu system we type in the command docker ps -a command.

Docker : Pull The Latest CentOS Image Into A Ubuntu Server

Image
The beauty of Docker is that you can run a very lightweight image of another Linux distro on your host system.  In this post we will be pulling the latest image of CentOS into our docker container on our Ubuntu server. Step-by-Step: 1. Open the terminal in Ubuntu, then make sure docker is running by typing service docker status, you should see something a message like the image below

Docker : Pull The Latest Fedora Image Into A Ubuntu Server

Image
The beauty of Docker is that you can run a very lightweight image of another Linux distro on your host system.  In this post we will be pulling the latest image of Fedora into our docker container on our Ubuntu server. Step-by-Step: 1. Open the terminal in Ubuntu, then make sure docker is running by typing service docker status, you should see something a message like the image below

Docker : Adding Non Root Users To The Docker Group In Ubuntu

Image
One of the most common task you have to do as a Linux administrator is to add a new user.  Especially developers who always wants root access. Docker needs root access, however the person who is administering Docker is probably not the system administrator.  Most likely it will be the application developer. To accomplish this task you can use the useradd command in the Terminal session then add the new user to the Docker group.  Follow the steps below to add a new user to Ubuntu. 1.  Switch into the root user using  sudo su -  command

ASP.NET Core : Adding The Default View With _ViewStart.cshtml

Image
In ASP.NET MVC there is a default layout file that the application use when one exists.  If you look at the markup at the top of the "Index.cshtml" file you will see that there is a markup to specify the layout of the page in the code below. @{ Layout = null; } The code above tells ASP.NET MVC to not assign any layout to the page because it is being set to null. In this blog we will build on our existing NorthwindCafe.Web    project and add a default layout view to the project so that each page in the project will have a common layout.  This is similar what you would a master page for in web forms.

Docker : Adding Docker Repository Key and Updating Docker To The Latest Version

Image
In the previous post we installed Docker on our Ubuntu server.  Now we are going to add the Docker repository to our local server so that we can get the latest version of Docker. Step-By-Step Instructions: Open the terminal command line tool and switch to root user with the sudo su command 2. Now we have to add the Docker repo key to our local machine by typing the following command wget -qO- https://get.docker.com/gpg | apt-key add - 3. The next command is to add the Docker repository to the Ubuntu repository source list.  Type the following command into the terminal: echo deb http://get.docker.com/ubuntu docker main > /etc/apt/sources.list.d/docker.list 4.  Now type apt-get update to get the latest updates from the Docker repository.  If you haven't ran update for a while.  This might take a while. 5.  After the update has completed type docker -v to the version number

Installing Docker On CentOS

Image
Docker is the hottest infrastructure technology to hit the tech world in a long time.  The appeal of Docker is that it allows the infrastructure team to utilize the capacity of the servers to near full capacity.  Docker is a container.  A container is like a micro virtualization minus the operating system.  It only contains enough infrastructure to host an app, without the fat.  Hence the term container is used to describe it. Here are the steps to install Docker on a CentOS Server: 1.  Open the CentOS terminal, then type the following command to switch to the super user:       sudo su 2.  Now get the latest update for CentOS by typing yum update 3.  To install Docker type the following command in the terminal     yum install -y docker 4.  Once the installation is complete type following command to start the docker service       systemctl start docker.service , then type systemctl status docker.service to see the current status      of our docker container.  You should see the message

Installing Docker On Ubuntu Server

Image
Docker is the hottest infrastructure technology to hit the tech world in a long time.  The appeal of Docker is that it allows the infrastructure team to utilize the capacity of the servers to near full capacity.  Docker is a container.  A container is like a micro virtualization minus the operating system.  It only contains enough infrastructure to host an app, without the fat.  Hence the term container is used to describe it. Here are the steps to install Docker on a Ubuntu Server: 1.  Open the Ubuntu terminal, then type the following command to switch to the super user:       sudo su 2.  Now get the latest update for Ubuntu by typing apt-get update 3.  To install Docker type the following command in the terminal      apt-get install -y docker.io 4.  Once the installation is complete type service docker status Now we have Docker installed and running on Ubuntu.  It was pretty simple wasn't it?

ASP.NET Core : Create Our First Controller and View

Image
In the previous post we have enabled MVC on our application.  Now we want to add our first MVC controller and view to test out verify that MVC is working.  We also have to tell ASP.NET Core what pattern to look for when looking for our controllers and views. Step-By-Step Instructions: 1.  Add a folder call "Controllers" in the root of your application 2. Right click on the "Controllers" folder and select "Add" → "New Item" → .NET Core → MVC Contoller Class, then click "Add" 3.  You see the "HomeController.cs" class being added to the "Controllers" folder 4.  Double click on the "HomeController.cs" file and you will see the following code using System; using System.Collections.Generic; using System.Linq; using System.Threading.Tasks; using Microsoft.AspNetCore.Mvc; namespace NorthwindCafe.Web.Controllers { public class HomeController : Controller { // GET: / / public IActionResult Ind

Enable MVC On ASP.NET Core Application

Image
In this post we will go over the process of enabling ASP.NET MVC in our application.  Just like static files, in order for us to use MVC in our application we have to tell ASP.NET Core to use in the Startup.cs file.  We will continue to use the application "NorthwindCafe" that we used in our previous blog. Here are the steps to add MVC to your application: 1.  Open the Startup.cs file, then in "ConfigureServices" method type in the following to enable MVC public void ConfigureServices(IServiceCollection services) { services.AddMvc(); } 2. As with the static files, there will be a red underline on the .AddMvc() method that's because we haven't added the package to your project yet.  So click on the yellow light and select the first option to add Microsoft.AspNET.Mvc package to our project. 3.  Now go into the Configure method and type app.UseMvc() into the method, the final markup should look like the following publ

Enable ASP.NET Core to Serve Static Files

Image
As I have mentioned before ASP.NET Core decouples the application from the infrastructure as much as possible.  Therefore, you have to tell it exactly what you want in your project.  In this blog post we are going to tell ASP.NET that we want to serve static html files in our application. Here are the steps to serve static files in our ASP.NET Core application. 1.  Open the "NorthwindCafe.Web" project, then click on the "Startup.cs" file in the project.  You will see the following markup in the Configure method public void Configure(IApplicationBuilder app) { app.Run(async (context) => { await context.Response.WriteAsync("Hello World!"); }); } 2.  Go into the Configure method, remove the existing code and type in the following code public void Configure(IApplicationBuilder app) { app.UseStaticFiles() } You will notice that the app.UseStaticFil

ASP.NET Core : Add jQuery, Bootstrap, AngularJS Using bower.json

Image
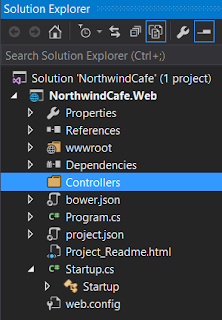
In this blog post we are going to add the jQuery, AngularJS, and bootstrap libraries to our ASP.NET Core application.  Normally we will use NuGet to bring in these libraries but ASP.NET Core gives you the option to use bower to configure the dependencies that you will need on the client-side. Here are the steps to import the client-side dependencies into our project: 1. First let's make bower.json part of the "NorthwindCafe.Web" project, by right click on the bower.json file, and then choose "Show in Solution Explorer" 2.  Open the bower.json file the markup should look like this { "name": "asp.net", "private": true, "dependencies": { } } 3. Change the markup to look like the following { "name": "asp.net", "private": true, "dependencies": { "bootstrap": "~3.3.6", "angular": "~1.5.7" } } 4. Save the bower.js

How To Create An ASP.NET Core Application From Scratch

Image
Technology has moved at a breakneck speed, after working with ASP.NET Core for a while, I realized that my ASP.NET MVC blog articles have become outdated.  Don't get me wrong, MVC is still a very big part of ASP.NET Core, but that's the thing it's just a part of it.  ASP.NET Core has decoupled the infrastructure from the application.  You can deploy your web app on Docker imagine that!  No longer is IIS your primary means of hosting your ASP.NET application. However, with this new freedom comes added complexity.  No longer can you just drag and drop components into your design surface.  Those days are long gone.  This post ist meant to ease your way into ASP.NET Core.  I will using the release candidate version two of ASP.NET Core for this post and other subsequent posts.  Don't be surprise if I update the version midstream because the product is still pre-release.  I will be using Visual Studio 2015 for my development.  You can use the command line interface and notepa