Posts

Showing posts from June, 2016

AngularJS SPA Pt 3 : Refactor Code to Not Use Global Variables (Shopping List App)

Image
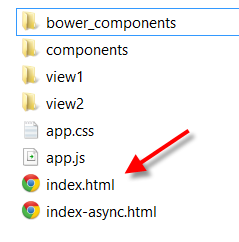
In the previous blog we got Angular-Seed to work with a module and a controller.  However, we put everything in the global scope.  The problem with that is that there are many JavaScript libraries that might be using the same variables as we are, or if we are working with other developers.  The way we can mitigate this problem is to wrap our modules and controllers in an anonymous function.  Think of an anonymous function as a wrapper or a container to hold our modules and controllers.  Another term developers like to refer to anonymous function is an IIFE.  Whatever it's called it's always good practice to avoid putting things in the global environment if it can be avoided. Here are the steps to take the modules and controllers out of the global environment: 1.  First let's wrap the module in an anonymous function.  The source code for the app.js file should look like the following (function(){ 'use strict'; var app = angular.module('shoppingList',

AngularJS SPA Pt 2 : Preparing Angular-Seed For The Shopping List Application

Image
The previous blog we setup the Angular-Seed boilerplate template for our SPA application.  In this blog we are going to prepare the Angular-Seed template for our SPA application which is going to be a simple shopping list application.  The steps below describes the steps to clean up some of the pages in the angular-seed template for our application. 1.  Delete the content of the "index.html" page in the angular-seed main folder.   It is located in the main folder of the angular-seed template "/angular-seed 2.  The source code file "index.html" should look like the following <!DOCTYPE html> <html lang="en"> <head> <meta charset="utf-8"> <title>Shopping List App</title> <link rel="stylesheet" type="text/css" href="app.css"> </head> <body> <script type="text/javascript" src="js/lib/angular.js"></script> <script type="t

Use Bower to Get Client Dependencies

Image
Bower is a JavaScript tool to get client dependencies in your project using npm packages. The requirement for bower is that you need to install Node.js first.  You can follow along in the this  blog  to install node.js, After node.js is installed open the command line and type the following command npm install -g bower The command above will install bower in your system globally.  Now we can use bower install packages individually, but the convenience of bower is in the bower.json file.  With the bower.json file we can specify all the dependencies that our project will need in one configuration file. Here are the steps: 1.  Create a folder call "AngularShoppingApp" 2.  Create a file call bower.json in your favorite text editor 3.  The content of the bower.json file should look like this { "name": "ShoppingApp", "private": true, "dependencies": { "angularjs": "~1.5.7", "bootstrap": "~3.3.

SQL: MAX() And MIN() Aggregate Functions

Image
The MAX() function gets the highest value in the specified column, and the MIN() function gets the lowest value in the specified column SELECT MAX(UnitPrice) AS HighestPrice, MIN(UnitPrice) AS LowestPrice FROM Products The query above gets the highest and lowest prices for the Products table in the Northwind database  

Bootstrap: Setting Up Bootstrap Using The Bootstrap CDN

"Bootstrap is the most popular HTML, CSS, and JS Framework for developing responsive, mobile first projects on the web."  - getbootstrap.com Brief Introduction: Bootstrap is a front-end framework using HTML, CSS and JavaScript to build menus, navigations, layouts, forms, tables, and etc.  What is special about Bootstrap is that mobile-first, and responsive design is it's default behavior.  Okay, hold on, let me put my professor's glasses on! Okay class here goes: Mobile-First Design :  You design your site for mobile devices first so the desktop version is second class citizen. Responsive Design: A design that makes your site look good on all screen sizes, and does not need to degrade gracefully.  Meaning you can resize, stretch, maximize, do yoga with your site and it will still look good.  Well up to a certain threshold. So to setup Bootstrap, you will do the following: 1. Create an HTML5 page <!DOCTYPE html> <html lang="en"> <head>

Installing Git For Windows

Image
Git is an open sourced version control system, that a lot of open source projects have a repository on. To install Git on Windows follow the directions in this blog. 1.  Go to http://www.git-scm.com 2.  Click on "Download for Windows" if you are using Windows, or "Downloads" if you are using other OS.  After you click on the button, save the download to a location on your desktop. 3.  Double click on the Git, .exe file that you've just downloaded 4.  Click "Next" on the welcome screen 5.  Click "Next" to accept the license screen 6.  Click "Next" to accept the path, or use the "Browse" button to choose a different path. 7.  Select the following components and then click "Next" 8.  Click "Next" to accept the "Start Menu Folder" name  9.  Select "Use Git from Windows Command Prompt", then click "Next" 10.  The program will install automatically, wait for it to finish 11.  Cli

SQL: DATEPART Function

Image
The DATEPART function extracts the date part of a date, for example using the 'yyyy' expression allows you to extract the year from a given date. The query below queries all the employees who were hired in the year 1994 in the Northwind Employees table. SELECT FirstName + ' ' + LastName AS Employee, HireDate FROM Employees WHERE DATEPART(yyyy,HireDate) = 1994 SELECT FirstName + ' ' + LastName AS Employee, HireDate FROM Employees WHERE DATEPART(MM,HireDate) = 10 The query above returns the records of employees who were hired on October

SQL: AVG() Aggregate Function

Image
The AVG() function gets the average of a column, the following query gets the average of the UnitPrice column in the Northwind Products table. SELECT AVG(UnitPrice) AS AveragePrice FROM Products

Bind Enum Type to A DropDownList Control In ASP.NET C#

Image
Suppose you have an enum type like the one below, and you want to bind the enum type to a DropDownList control in a Web Forms application.  How would you do this?  There's an easy way to do this with just a few lines of code.  You'll be amaze at how simple it is. First of all here is our markup code in our .aspx page <%@ Page Language="C#" AutoEventWireup="true" CodeBehind="Default.aspx.cs" Inherits="Sandbox.Default" %> <!DOCTYPE html> <html xmlns="http://www.w3.org/1999/xhtml"> <head runat="server"> <title></title> </head> <body> <form id="form1" runat="server"> <div> <asp:DropDownList ID="DropDownList1" runat="server"></asp:DropDownList> </div> </form> </body> </html> Now let's define our enum type, the last value is 400 just to confirm that the Dr

SQL: COUNT() Aggregate Function

Image
The COUNT() function returns the number of rows in the specified table. There are two ways you can use COUNT(), which are the following: COUNT(*) count all the rows in the table including COUNT(column) return all the rows that contains value for the column, excluding the columns with null value SELECT COUNT(*) AS NumberOfRows FROM Customers The query above returns the number of rows in the Customers table SELECT COUNT(Region) AS NumberOfRows FROM Customers The query above counts the number of rows for the column "Region" that are not NULL

ASP.NET GridView Control Part 1: Getting Started, Create GridView in Web Form

Image
The GridView data grid control is probably the most popular and flexible data grid control in the ASP.NET arsenal.  In this tutorial we will create a new GridView data grid on a web form. Here are the steps: 1. Click on the "Design" tab in main window of Visual Studio 2. Click on the "Toolbox" tab, then expand the "Data" node, then drag the "GridView" data control to the Design surface.  The Design Surface is the big window in the middle of Visual Studio. 3. Click on "Toolbox" tab again, this time drag the "SqlDataSource" control to the Design Surface 4. Click on the ">" button next to SqlDataSource1 control, then select "Configure Data Source" 5. Click on the "New Connection" button  6. Select your "Server name", SQL Server should pick up your database server automatically if it's on a local machine, but if it doesn't type in (local) in the "Server name" field.   7.

ASP.NET: Getting The Inserted ID Back With Scope_Identity()

When you need to do an insert into multiple database table you need to the get the ID of the insert so that you could use that ID for the next insert. Here is how you would do that with the Scope_Identity()which gets the last inserted ID back to you if you execute your query with the ExecuteScalar() method. SqlCommand cmd = new SqlCommand("INSERT INTO Users (" + "LoginName," + "FirstName," + "LastName," + "Password," + "Email," + "DOB," + "Sex" + ") VALUES (" + "@Email," + "@FirstName," + "@LastName," + "@Password," + "@Email," + "@DOB,"

SqlDbType.Date

string dobStr = ddlMonth.SelectedValue + "/" + txtDay.Text + "/" + txtYear.Text; SqlParameter dob = new SqlParameter("DOB", Convert.ToDateTime(dobStr)); dob.SqlDbType = SqlDbType.Date; cmd.Parameters.Add(dob);

CSS: Padding Properties

padding: top right bottom left padding:100px 75px 50px 25px; Long hand version padding-top:100px; padding-right:75px; padding-bottom:50px; padding-left:25px; All four sides 100px padding:100px;

ASP.NET Get The Current Page File Name

In this blog we will get the current page file name that the user is currently on. string[] currentUrl = HttpContext.Current.Request.Url.AbsolutePath.Split('/'); string pageFileName = currentUrl[currentUrl.Length-1];

ADO.NET: Using System.Data.SqlClient.SqlDataAdapter To Fill System.Data.DataTable

In this example we will use the SqlDataAdapter to fill a DataTable then bind the data to a GridView  1. Drag a GridView into your ASP.NET page 2. Use the following code to the fill the dtProducts DataTable with the adapter SqlDataAdapter, then bind it to the GridView1 control. protected void Page_Load(object sender, EventArgs e) { DataTable dtProducts = new DataTable(); string connString = WebConfigurationManager.ConnectionStrings["NorthwindConnectionString"]. ConnectionString; using (SqlConnection conn = new SqlConnection(connString)) { SqlCommand cmd = new SqlCommand("SELECT * FROM Products", conn); conn.Open(); SqlDataAdapter adapter = new SqlDataAdapter(cmd); adapter.Fill(dtProducts); GridView1.DataSource = dtProducts; GridView1.DataBind(); } }

C#: System.Collections.Generic.Dictionary

Namespace: System.Collections.Generic Declaration: Dictionary<string, string> account = new Dictionary<string, string>(); Adding Items: account.Add("id","1"); account.Add("username", "jackd"); Use in ArrayList: Namespace: System.Collections Add Dictionary to ArrayList: Dictionary<string, string> account = new Dictionary<string, string>(); ArrayList aList = new ArrayList(); account.Add("id","1"); account.Add("username", "jackd"); aList.Add(account); account = new Dictionary<string, string>(); account.Add("id","2"); account.Add("username", "janed"); aList.Add(account); account = new Dictionary<string, string>(); account.Add("id","3"); account.Add("username", "d"); Loop Through ArrayList of Dictionary Type: foreach (Dictionary<string, string> dic in aList) { Response.Write("id:

SQL: The NOT IN Operator

Image
The NOT IN operator in SQL means that you are retrieving records in the database that does not match the values in a comma separated list. In other words it retrieves the inverse of the IN statement by itself. Here is an example of how you can use the IN operator in the products table in the Northwind database. SELECT * FROM Products WHERE SupplierID NOT IN (1,2) The above example all the products will be retrieved except for products with SupplierID of 1 or 2, here are the results

SQL: The IN Operator

Image
The IN operator in SQL means that you are retrieving records in the database that matches the values in a comma separated list. Here is an example of how you can use the IN operator in the products table in the Northwind database. SELECT * FROM Products WHERE SupplierID IN (1,2) In the above example all the products with the SupplierID of 1 or 2 are retrieved.

SQL: Using Parentheses To Get Expected Result

Image
SQL Server as well as other DBMS has an order of evaluation that can throw you off. Especially when you have more than one comparison in the WHERE clause. In this example I will show you the difference between using a parentheses and not using one, and how by using parentheses can give the results that you want.  Suppose you want to get the products with CategoryID 1 and 2 that are priced less than 15 dollars in the Products table in the Northwind database. Here is the query without the parentheses: SELECT CategoryID,ProductName,UnitPrice FROM Products WHERE CategoryID = 1 OR CategoryID =2 AND UnitPrice < 15 When you run the query above you would expect that all the records retrieved will have a unit price of less than $15 dollar but that is not the case. Below is the result from the query. As you can see several records have unit price that are greater than $15 dollars Now let's run the query with parantheses SELECT CategoryID,ProductName,UnitPrice FROM Products WHERE (Cate

SQL: Checking ShippedDate Column For NULL

Retrieve records with NULL value in the ShippedDate column in the Orders table in Northwind SELECT OrderID, ShippedDate FROM Orders WHERE ShippedDate IS NULL Retrieve records that is does not have NULL value in the ShippedDate column in the Orders table in Northwind SELECT OrderID, ShippedDate FROM Orders WHERE ShippedDate IS NOT NULL

SQL: SELECT Rows Between Certain Dates

Let's say you want to know the orders that takes place in the Northwind database table Orders tables that occurs during the Christmas Eve 1997-12-24 and the New Years Day the following year in 1998-01-01. Here is the SQL to query the OrderID between those date range: SELECT OrderID, OrderDate FROM Orders WHERE OrderDate BETWEEN '1997-12-24' AND '1998-01-01'

ASP.NET Populate The DropDownList Control With The Northwind Categories Table

Image
The Categories table is a perfect example of how sometimes you have to populate the DropDownList control to data from the database. In this example we will populate the DropDownList control to the Categories table in the Northwind database.  1. Drag the DropDownList control into a .aspx page. Make sure you check "Enable AutoPostBack" 2.  In your C# code file you need the namespaces using System.Web.Configuration; using System.Data.SqlClient; using System.Data; 2. Then get the Northwind connection string value from the Web.config file string connectString = WebConfigurationManager.ConnectionStrings["NorthwindConnectionString"]. ConnectionString; 3. Type in the following code in the Page_Load method protected void Page_Load(object sender, EventArgs e) { if (!Page.IsPostBack) { using (SqlConnection conn = new SqlConnection(connectString)) { SqlCommand cmd = new SqlCommand(&qu

T-SQL: Stored Procedures (SELECT), SELECT By ID, Select Products by Supplier ID

Image
In this example we will pass an input parameter to determine the result of the query.  We will pass in supplier id to get all the products that are provided by the supplier. Here is the code Use Northwind GO CREATE PROCEDURE dbo.selProductsBySupplierID @SupplierID int AS SELECT DISTINCT p.ProductID, p.ProductName, p.UnitPrice FROM Products p INNER JOIN Suppliers s ON p.SupplierID = @SupplierID GO The @SupplierID is the input parameter that the stored procedure expects, you use it in the join portion of the statement to match the SupplierID in the Products table. The DISTINCT keyword means that the query will only return one row in the result if there are duplicate rows. Type the following to execute the stored procedure with the supplier id of 1 EXEC dbo.selProductsBySupplierID 1 The result should look like this

ASP.NET: Programmatically Connect to The Database Using SqlConnection, DataReader and SqlCommand

So you have following connection string to the Northwind database in your Web.config and you want to connect to the database in the code behind instead using query builder. <connectionStrings> <add name="NorthwindConnectionString" connectionString="Data Source=(local); Initial Catalog=Northwind;Integrated Security=True" providerName="System.Data. SqlClient"/></connectionStrings> Here is how you would do it 1. Get the connection from the Web.config file programmatically, you can look at this blog to find out how perform this step by step.  But here is the code to get the connection string from the Web.config file string connectString = WebConfigurationManager.ConnectionStrings["NorthwindConnectionString"]. ConnectionString; 2.  On the top of the file specify that you want to use the Sql.Data.SqlClient namespace by typing using System.Data.SqlClient; 3. Now type the following using (SqlConnection conn = new SqlConnection(

ASP.NET: Set Up SQL Server for ASP.NET Provider Databases

Image
Out of the box the ASP.NET provider databases works with the local database file call aspnetdb.mdf, however in a production environment you cannot use this file because you need to work with the production database. To create the provider databases on a full version of SQL Server perform the following steps. 1. Navigate to the .NET Framework version that you want to use. Version 4.5 and Version 2 has the provider database wizard. I am using version 4.5 so the path is C:\Windows\Microsoft.NET\Framework\v4.0.30319 2. Double click on the file aspnet_regsql.exe, the ASP.NET SQL Server Setup Wizard will apear, click "Next" to continue 3.  Select "Configure SQL Server for application services" radio button, then click next 4. Type in the database server name in the "Server:" field.  Make sure you type in the actual host name because if you type in (local) or localhost the database creation process will fail.   Leave the option as "Windows authentication&