ASP.NET Core : Create Our First Controller and View
In the previous post we have enabled MVC on our application. Now we want to add our first MVC controller and view to test out verify that MVC is working. We also have to tell ASP.NET Core what pattern to look for when looking for our controllers and views.
Step-By-Step Instructions:
1. Add a folder call "Controllers" in the root of your application
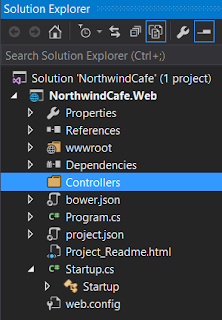
2. Right click on the "Controllers" folder and select "Add" → "New Item" → .NET Core → MVC Contoller Class, then click "Add"

3. You see the "HomeController.cs" class being added to the "Controllers" folder

5. Create a folder in the root of the application call "Views" then inside the "Views" folder create another folder call "Home"
6. Right click on the "Home" folder and select Add → New Item → .NET Core → MVC View Page, keep the name of the view as Index.cshtml then click "Add"

7 . Double click on the view "Index.cshtml" and type "Hello World" between the <div> tag like the markup below
8. Press Ctrl+F5 to run the application, you will see the following.

The code above configures the default route for our application with name of the route assigned to "Default", the "template:" field specifies the pattern that MVC should look for when locating our routes. The "defaults:" field uses an anonymous object to define a default route in case nothing is found or nothing is typed into the URL.
11. Now when you press Ctrl+5 you will see our "Hello World"

Step-By-Step Instructions:
1. Add a folder call "Controllers" in the root of your application

2. Right click on the "Controllers" folder and select "Add" → "New Item" → .NET Core → MVC Contoller Class, then click "Add"
3. You see the "HomeController.cs" class being added to the "Controllers" folder

4. Double click on the "HomeController.cs" file and you will see the following code
using System;
using System.Collections.Generic;
using System.Linq;
using System.Threading.Tasks;
using Microsoft.AspNetCore.Mvc;

namespace NorthwindCafe.Web.Controllers
{
    public class HomeController : Controller
    {
        // GET: //
        public IActionResult Index()
        {
            return View();
        }
    }
}
5. Create a folder in the root of the application call "Views" then inside the "Views" folder create another folder call "Home"
6. Right click on the "Home" folder and select Add → New Item → .NET Core → MVC View Page, keep the name of the view as Index.cshtml then click "Add"
7 . Double click on the view "Index.cshtml" and type "Hello World" between the <div> tag like the markup below
@{
    Layout = null;
}

<!DOCTYPE html>

<html>
<head>
    <meta name="viewport" content="width=device-width" />
    <title>Index</title>
</head>
<body>
    <div>
        Hello World!
    </div>
</body>
</html>
8. Press Ctrl+F5 to run the application, you will see the following.
9. All you will see is an empty page, where is our "Hello World"? The reason we don't see our view is because we haven't define any routes for our application yet.
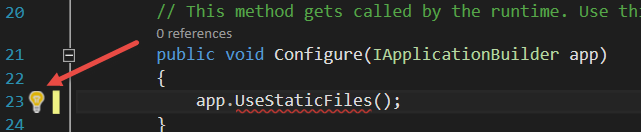
10. To enable routing for our application open up the Startup.cs file and modify the app.UseMvc() method's config instance to configure the routes for our application
        public void Configure(IApplicationBuilder app)
        {
            app.UseStaticFiles();
            app.UseMvc(config => {
                config.MapRoute(
                    name: "Default",
                    template: "{controller}/{action}/{id?}",
                    defaults: new  { controller = "Home", action = "Index" }
                    );
            });
        }
The code above configures the default route for our application with name of the route assigned to "Default", the "template:" field specifies the pattern that MVC should look for when locating our routes. The "defaults:" field uses an anonymous object to define a default route in case nothing is found or nothing is typed into the URL.
11. Now when you press Ctrl+5 you will see our "Hello World"


Comments
Post a Comment