How To Create An ASP.NET Core Application From Scratch
Technology has moved at a breakneck speed, after working with ASP.NET Core for a while, I realized that my ASP.NET MVC blog articles have become outdated. Don't get me wrong, MVC is still a very big part of ASP.NET Core, but that's the thing it's just a part of it. ASP.NET Core has decoupled the infrastructure from the application. You can deploy your web app on Docker imagine that! No longer is IIS your primary means of hosting your ASP.NET application.
However, with this new freedom comes added complexity. No longer can you just drag and drop components into your design surface. Those days are long gone. This post ist meant to ease your way into ASP.NET Core. I will using the release candidate version two of ASP.NET Core for this post and other subsequent posts. Don't be surprise if I update the version midstream because the product is still pre-release. I will be using Visual Studio 2015 for my development. You can use the command line interface and notepad to develop your ASP.NET Core application. But, I think that borders on insanity.
So let's begin our journey together!
Here are the steps to create an ASP.NET Core application from scratch:
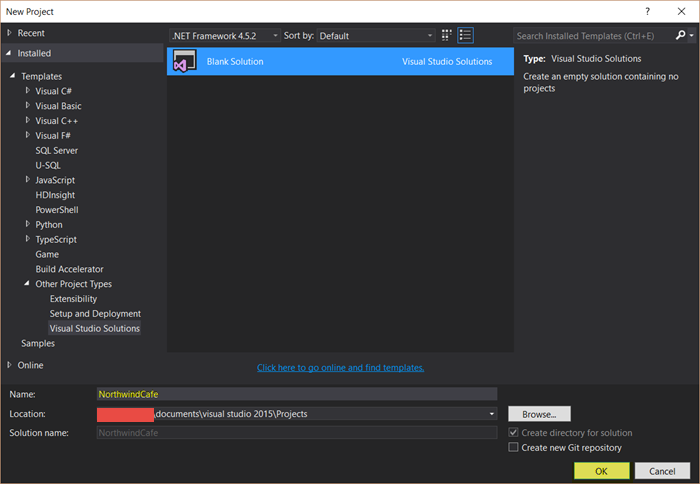
1. Create an empty Visual Studio solution File → New → Project → Other Project Types → Visual Studio Solutions → Blank Solution. In the name field call the solution "NorthwindCafe" then press "OK"
2. Now that we have the blank solution we can add the ASP.NET Core project, right click on the "NorthwindCafe" solution, then select "Add" → New Project → Visual C# →.NET Core → ASP.NET Core Web Application (.NET Core) . In the "Name" field give it the name "NorthwindCafe.Web" then click "OK"

3. On the "Select a template" screen select "Empty" then click "OK"

4. After you click "OK" you will see the following folder structure for your project. As you can see it's very bare bones to start with. The first thing you will notice is that there is a "wwwroot" folder and a project.json file. The wwwroot folder represents your webroot directory remember you are not developing for just IIS anymore. So everything in the wwwroot would work on the client side. The other file project.json file is used to configure all of your project's dependencies. One thing to keep in mind is that nothing has been enabled yet. You have to configure the application to use what you need.

5. The first thing we want to add is a bower config file into your project so that we can obtain the client dependencies that we need. The neat thing about ASP.NET Core is that bower will put the dependencies in a folder call "lib" inside the "wwwroot" folder. If you need a refresher on bower you can go to this post . To add the bower configuration file right-click on the "NorthwindCafe.Web" project. Then select → New Item →.NET Core → Client-side → Bower Configuration File then click "OK"
6. The bower.json file should have the following markup
7. If you look at the project you won't see the "bower.json" file, the reason is because you haven't added to the project yet. To make the "bower.json" file appear in your project Click on the "Show All Files" icon.

This concludes the post for today. In subsequent posts we will build on this project to make this a full blown application. Thank you for reading! I hope you've enjoyed this post.
ASP.NET Core Posts:
However, with this new freedom comes added complexity. No longer can you just drag and drop components into your design surface. Those days are long gone. This post ist meant to ease your way into ASP.NET Core. I will using the release candidate version two of ASP.NET Core for this post and other subsequent posts. Don't be surprise if I update the version midstream because the product is still pre-release. I will be using Visual Studio 2015 for my development. You can use the command line interface and notepad to develop your ASP.NET Core application. But, I think that borders on insanity.
So let's begin our journey together!
Here are the steps to create an ASP.NET Core application from scratch:
1. Create an empty Visual Studio solution File → New → Project → Other Project Types → Visual Studio Solutions → Blank Solution. In the name field call the solution "NorthwindCafe" then press "OK"
2. Now that we have the blank solution we can add the ASP.NET Core project, right click on the "NorthwindCafe" solution, then select "Add" → New Project → Visual C# →.NET Core → ASP.NET Core Web Application (.NET Core) . In the "Name" field give it the name "NorthwindCafe.Web" then click "OK"
3. On the "Select a template" screen select "Empty" then click "OK"
4. After you click "OK" you will see the following folder structure for your project. As you can see it's very bare bones to start with. The first thing you will notice is that there is a "wwwroot" folder and a project.json file. The wwwroot folder represents your webroot directory remember you are not developing for just IIS anymore. So everything in the wwwroot would work on the client side. The other file project.json file is used to configure all of your project's dependencies. One thing to keep in mind is that nothing has been enabled yet. You have to configure the application to use what you need.
5. The first thing we want to add is a bower config file into your project so that we can obtain the client dependencies that we need. The neat thing about ASP.NET Core is that bower will put the dependencies in a folder call "lib" inside the "wwwroot" folder. If you need a refresher on bower you can go to this post . To add the bower configuration file right-click on the "NorthwindCafe.Web" project. Then select → New Item →.NET Core → Client-side → Bower Configuration File then click "OK"
6. The bower.json file should have the following markup
{
 "name": "asp.net",
 "private": true,
 "dependencies": {
 }
}
7. If you look at the project you won't see the "bower.json" file, the reason is because you haven't added to the project yet. To make the "bower.json" file appear in your project Click on the "Show All Files" icon.

This concludes the post for today. In subsequent posts we will build on this project to make this a full blown application. Thank you for reading! I hope you've enjoyed this post.
ASP.NET Core Posts:
- How To Create An ASP.NET Core Application From Scratch
- ASP.NET Core : Add jQuery, Bootstrap, AngularJS Using bower.json
- Enable MVC On ASP.NET Core Application


Comments
Post a Comment