Posts

Showing posts with the label Ubuntu

Docker : Command to See What Containers Are Running

Image
In our previous blog posts we ran containers with the Fedora and CentOS images.  In this blog we are going to run a command to see which containers are running in our host system.  To get a list of all the containers running on our host Ubuntu system we type in the command docker ps -a command.

Docker : Pull The Latest CentOS Image Into A Ubuntu Server

Image
The beauty of Docker is that you can run a very lightweight image of another Linux distro on your host system.  In this post we will be pulling the latest image of CentOS into our docker container on our Ubuntu server. Step-by-Step: 1. Open the terminal in Ubuntu, then make sure docker is running by typing service docker status, you should see something a message like the image below

Docker : Pull The Latest Fedora Image Into A Ubuntu Server

Image
The beauty of Docker is that you can run a very lightweight image of another Linux distro on your host system.  In this post we will be pulling the latest image of Fedora into our docker container on our Ubuntu server. Step-by-Step: 1. Open the terminal in Ubuntu, then make sure docker is running by typing service docker status, you should see something a message like the image below

Docker : Adding Non Root Users To The Docker Group In Ubuntu

Image
One of the most common task you have to do as a Linux administrator is to add a new user.  Especially developers who always wants root access. Docker needs root access, however the person who is administering Docker is probably not the system administrator.  Most likely it will be the application developer. To accomplish this task you can use the useradd command in the Terminal session then add the new user to the Docker group.  Follow the steps below to add a new user to Ubuntu. 1.  Switch into the root user using  sudo su -  command

Docker : Adding Docker Repository Key and Updating Docker To The Latest Version

Image
In the previous post we installed Docker on our Ubuntu server.  Now we are going to add the Docker repository to our local server so that we can get the latest version of Docker. Step-By-Step Instructions: Open the terminal command line tool and switch to root user with the sudo su command 2. Now we have to add the Docker repo key to our local machine by typing the following command wget -qO- https://get.docker.com/gpg | apt-key add - 3. The next command is to add the Docker repository to the Ubuntu repository source list.  Type the following command into the terminal: echo deb http://get.docker.com/ubuntu docker main > /etc/apt/sources.list.d/docker.list 4.  Now type apt-get update to get the latest updates from the Docker repository.  If you haven't ran update for a while.  This might take a while. 5.  After the update has completed type docker -v to the version number

Linux Ubuntu Server: Switching To root User With The sudo Command

Image
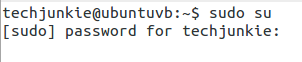
Since Ubuntu does not configure the root account by default you have to manually assign root a password before you can use the root account.  However, there's a way to log in as "root" without setting up the "root" password.  The way to do this is to use the "sudo" and "su" command in combination.  The "sudo" elevates your privileges to root like priviledges, while the "su" command is used to switch from one user to another.  So when used together you get to log in as "root". So in your Linux prompt type in the following command sudo su enter the password when asked, after you've entered your password you can run commands as "root"

Ubuntu Server : Installing Apache Web Server Part 1

Image
Apache (HTTPD) is the most popular web server on the web right now.  It is from the Apache Software Foundation.  A web server serves content to the web.  The power of Apache lies in it's modules which allows you to process scripting languages such as Perl, and PHP. In this blog we will go over how to install the Apache Http Web Server on the Ubuntu Server: 1.  In the terminal type in the following command apt-cache search apache  | more the "search" command searches for the latest apache web server version, we added the "more" command so that we can press enter to scroll as you can see the "Apache HTTP Server" is called "apache2" 2.  Press "q" to get out of "more" listing 3.  Type in the following command to install the apache2 package sudo apt-get install apache2 4.  When asked if you want to continue select "Y" 5. The installation will go on automatically 6.  Once you get your prompt back type in the following ...

Oracle VM VirtualBox : Install A Desktop GUI on Ubuntu Server Part 4

Image
The topic of installing a desktop GUI has been debated over the years.  Friendships have been ruined because of it.  I don't know if that's true, but some believe that the server should only have command line.  This blog is not about that debate, I just want to see some freaking graphics on the monitor, and for my mouse to be more than a paper weight.  So there's my opinion on the subject. Anyways installing a GUI on Ubuntu server is really easy. Here are the steps: 1. Start up your Ubuntu server VM 2. Log into Ubuntu with your credentials 3. Make sure you have internet connection, and type in the following command without the double quotes of course, "sudo apt-get install ubuntu-gnome-desktop"  4.  You have to confirm that your are lord sudo of the Ubuntu clan.  I mean, sudo is a command that let's you execute commands with elevated privileges.  But not all users have sudo power, only the special ones. 5.   When asked "Do you want to continu...

Oracle VM VirtualBox : Install Ubuntu Operating System on VirtualBox Part 3

Image
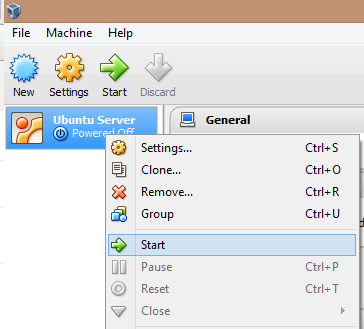
In the previous two blogs we've gone through the steps to setting up the virtual machine to install the Ubuntu Server on VirtualBox, in this blog we will go over the steps to installing the Ubuntu Server. Be warn this is a long blog.  I usually try to break up my blog so that you won't doze off, but I feel like this one has be left in tack.  Here are the steps to install Ubuntu Server on your VirtualBox.  1. Right click on the "Ubuntu Server" virtual machine and select "Start" 2.  Select "English", then press Enter 3. Click or press Enter on  "Install Ubuntu Server" 4. Click "Capture" on the dialog that pops up Note: Press Windows Icon + Ctrl to uncapture your mouse, so that you can get control back of your mouse. 4. Select "English" or the language that you speak for the installation process language 5. Select your location 6.  Select "No" on "Detect keyboard layout?" question, this is a matter of...