Posts

Showing posts with the label NuGet

ASP.NET MVC 5 From Scratch : Add KnockoutJs to Project With NuGet

Image
In this blog we will add the KnockoutJs JavaScript library to our MvcApp project.  KnockoutJs is a great lightweight data binding library.  Follow the steps below to add KnockoutJs to your ASP.NET MVC project. Step-By-Step Instructions : 1.  Right-click on the project's "References" node, then select "Manage NuGet Packages" 2. In right hand side type in "knockoutjs", then click on the "Install" button next to the knockoutjs package   3.  You should see a green checkmark after you finished adding the knockoutjs library to the MvcApp project. 4. In the "Scripts" folder you will see the knockout JavaScript files 5.  Now that we have the knockoutjs files we need to add the files to the BundleConfig.cs file to register them 6.  Open the BundleConfig.cs file in the "App_Start" folder type the following lines of code inside the RegisterBundles method, this tells MVC to include any files in the "Scripts" folder that sta...
ASP.NET MVC 5 From Scratch : Adding BundleConfig

Image
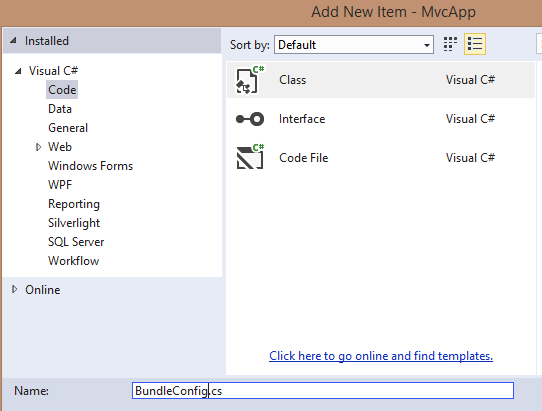
In our previous blog we've added a _ViewStart.cshtml layout to our project, which is the default layout for our pages if no layout is specified for the page.  In this blog we will add BundleConfig for the JavaScript libraries which includes JQuery , and Bootstrap that we've added to our MvcApp project in the previous blogs.  A configuration bundle allows you to group files that belongs in the same libraries together so that they can called with just one line of code.  In this blog we will be creating configuration bundles for JQuery, and Bootstrap to the MvcApp project. Step-By-Step Instructions : 1.  Right-click on the folder "App_Start", then select Add → New Item → Visual C# → Class, name the class BundleConfig.cs 2.  Now the App_Start folder should look like the screenshot below 3.  Open the BundleConfig.cs file, then delete the existing using statements, and then add the following namespaces using System.Web; using System.Web.Optimization; 4. The resu...

ASP.NET MVC 5 From Scratch : Add JQuery Library Using NuGet

Image
In the previous blog we've created an empty ASP.NET MVC 5 project.  It's a great starting point but, it's missing a lot things that we will need later.  In this blog we will add JQuery to the empty ASP.NET MVC 5 project that we've just created. Step-By-Step Instructions: 1. Open the empty ASP.NET MVC 5 project that you've just created 2.  Right click on the the "References" node in the "Solution Explorer", then select "Manage NuGet Packages" 3. In the search box on the right of NuGet window type "JQuery", the search result will be displayed 4. Click on the "Install" button next to the JQuery result, it should be at the top of the list 5. Once the JQuery library has been installed a green check mark is displayed, click on the "Close" button 6.  Now you should see the JQuery scripts in the "Scripts" folder 7.  To use the JQuery .js script reference the jquery-2.14.min.js file with the following code...

ASP.NET MVC 5 From Scratch : Add Bootstrap Library Using NuGet

Image
In the previous blog we've created added the JQuery library to an empty ASP.NET MVC 5 project. In this blog we will add the Bootstrap to the empty ASP.NET MVC 5 project that we've just created. Step by Step Instructions: 1. Open the empty ASP.NET MVC 5 project that you've just created 2.  Right click on the the "References" node in the "Solution Explorer", then select "Manage NuGet Packages" 3.  In the search box on the right of NuGet window type "bootstrap", the search result will be displayed 4. Click on the "Install" button next to the "Bootstrap" result, it should be at the top of the list 5.  Once the Bootstrap library has been installed a green check mark is displayed, click on the "Close" button 6.  Now you should see the Bootstrap scripts in the "Scripts" folder 7.  You will also noticed that the "Contents" folder has been created, this folder was created when NuGet installed...

ASP.NET MVC : Upgrade ASP.NET MVC 4 to ASP.NET MVC 5 Using NuGet Part 1

Image
In this blog we will go over how to upgrade your existing project which uses ASP.NET MVC 4 to ASP.NET MVC 5 using NuGet.  During the upgrade you will encounter some errors but they are easy enough to fix by changing the Web.Config file.  In the first blog we will create a simple ASP.NET MVC 4 application from scratch. But first thing is first let's begin by creating a project in ASP.NET MVC 4: Create a blank solution in Visual Studio call "MVCProjects" 2.  Now add a new project to the "MVCProjects" by selecting ASP.NET MVC4, call it "MyMVC4". Make sure you select Visual C# → Web → Visual Studio 2012 → ASP.NET MVC 4 Web Application, then click "OK" 3. Select the "Empty" template, and "Razor" as the "View Engine", then click "OK" 4. Right click on the "Controller" and select "Add" → "Controller" 5.  On the "Add Controller" screen type "HomeController" on t...

ASP.NET MVC : Upgrade ASP.NET MVC 4 to ASP.NET MVC 5 Using NuGet Part 2

Image
In the previous blog  we went over how to create a simple ASP.NET MVC 4 application.  In this blog we will go over the steps to upgrade our ASP.NET MVC 4 application to ASP.NET MVC 5 application. Step-By-Step Instructions: Open the "MyMVC4" project that you've created on the last blog Right click on the project and select "Manage NuGet Packages..." 3.  Select Microsoft ASP.NET MVC and click "Install", as you can see the latest version is 5.2.3 4.  Click "I Accept" on the license agreement screen 5.  There will be a check mark after ASP.NET MVC 5 has been installed by NuGet 6.  Before you click the "Close" button make a note of the "Description" section, pay close attention to the "Dependencies" section, it will come in handy later. 7.  Visual Studio will give you a message that to complete the upgrade you have to restart Visual Studio.  Click "OK" 8.  Close Visual Studio and then open the "MyMVC4...