Using Bootstrap To Make Your Form Fields Look More Professional
In this blog we will turn ordinary form fields to a more modernized and professional looking form fields by using the bootstrap library. Let's say we have the following form fields with no formatting, or layouts applied to it with the following markup.
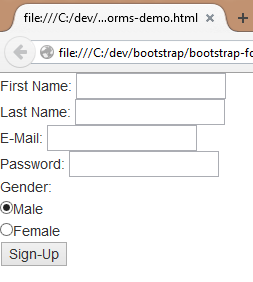
As you can see the form is pretty ordinary, and if I could be politically incorrect quite ugly.
Now we are going to turn this ugly form into something that is more presentable with the use of the bootstrap components call "Input groups". As with anything in bootstrap we will use css classes to change the look and feel of the input fields above.
The new markup looks like the following:
The new form fields look like the screenshot below in a browser:
As you can see with just a few changes in our markup we can have a professional looking form field in our registration form. Let's examine the code more closely.
The first thing we have to do is enclose the form fields in a "form-group" class.
<div class="form-group form-group-spacing col-lg-4 col-md-4">
form-group-spacing is just a class we created to provide some spacing for the form fields. Then we want to limit the space of the form fields to just four columns on the bootstrap grid system. A grid system is bootstrap's way of defining the layout in a page. Basically it divides the page into twelve columns, with lg = large resolution (large screen), md= medium resolution (medium screen), sm = small resolution (small screen usually mobile devices) . So in our code we tell bootstrap to give us four large columns and four medium columns, usually I just leave the sm settings for bootstrap to handle and define just the lg and md sizes. For more information on the bootstrap grid system go to Bootstrap Grid System.
Then we just add the <label> tag for each form labels: For example for the first name form field we added the code <label for="firstName" class="form-label-spacing">First Name:</label>, the "for" attribute, specify with form field id the label tag is for. Then in the <input class="form-control" type="text" id="firstName" placeholder="First Name"> tag we add the class="form-control" to make the form field pretty, the placeholder is optional, it shows the default text that is displayed to the user. We do this for all the form fields, except for radio button fields.
The radio button fields we create another <div class="form-group"> to provide it's own spacing. We then tell bootstrap that we are dealing with radio buttons in the <div> tag <div class="radio">. Notice how the labeling is different for the label we just have the label on top, and then an opening and closing <label> tags around the actual radio button input fields and no attributes in the <label> tags. This is because the radio button label is already defined with the word "Male" and "Female".
<div class="form-group">
<label class="form-label-spacing" for="gender">Gender:</label>
<div class="radio">
<label><input type="radio" name="gender" id="gender">Male</label><br/>
<label><input type="radio" name="gender" id="gender">Female</label>
</div>
</div>
Then we define the button with the following markup
<button type="button" class="btn btn-default">Sign Up</button>
The markup above just give the button the default button style in bootstrap.
Finally, we tell bootstrap to use up the other eight columns on the page with this tag
<div class="col-lg-8 col-md-8"/>
The reason we specify that we want bootstrap to use the other eight columns is because we don't want to have any weird layouts when the browser is resized. All twelve columns have been defined on the page.
If you look in FireBug you will see that form fields are styled with some pretty fancy CSS styles. But all we had to do was call the CSS class, bootstrap does all the work for us.
<!DOCTYPE html>
<html lang="en">
    <head>
        <meta charset="utf-8" />
<script src="http://code.jquery.com/jquery-1.11.2.min.js"></script>
<script src="https://maxcdn.bootstrapcdn.com/bootstrap/3.3.2/js/bootstrap.min.js"></script>
<!-- Latest compiled and minified CSS -->
<link rel="stylesheet" href="https://maxcdn.bootstrapcdn.com/bootstrap/3.3.2/css/bootstrap.min.css">
<!-- Optional theme -->
<link rel="stylesheet" href="https://maxcdn.bootstrapcdn.com/bootstrap/3.3.2/css/bootstrap-theme.min.css">
        <title></title>
    </head>
    <body>
         <form>
   First Name: <input name="First Name" type="text"><br/>
   Last Name: <input name="Last Name" type="text"><br/>
   E-Mail: <input name="E-Mail" type="text"><br/>
   Password: <input name="Password" type="password"><br/>
   Gender:
   <br/><input type="radio" name="gender" value="male" checked>Male<br/>
    <input type="radio" name="gender" value="female">Female<br/>
   <input type="submit" value="Sign-Up"/>
  </form>
    </body>
</html>
As you can see the form is pretty ordinary, and if I could be politically incorrect quite ugly.
Now we are going to turn this ugly form into something that is more presentable with the use of the bootstrap components call "Input groups". As with anything in bootstrap we will use css classes to change the look and feel of the input fields above.
The new markup looks like the following:
<!DOCTYPE html>
<html lang="en">
    <head>
        <meta charset="utf-8" />
<script src="http://code.jquery.com/jquery-1.11.2.min.js"></script>
<script src="https://maxcdn.bootstrapcdn.com/bootstrap/3.3.2/js/bootstrap.min.js"></script>
<!-- Latest compiled and minified CSS -->
<link rel="stylesheet" href="https://maxcdn.bootstrapcdn.com/bootstrap/3.3.2/css/bootstrap.min.css">
<!-- Optional theme -->
<link rel="stylesheet" href="https://maxcdn.bootstrapcdn.com/bootstrap/3.3.2/css/bootstrap-theme.min.css">
        <title></title>
  <style>
   .form-label-spacing{
    margin-top: 15px;
   }

   .form-group-spacing
   {
    margin-left: 20px;
   }
  </style>
    </head>
    <body>
         <form>
   <div class="row">
   <div class="form-group form-group-spacing col-lg-4 col-md-4">
    <label for="firstName" class="form-label-spacing">First Name:</label>
     <input class="form-control" type="text" id="firstName" placeholder="First Name">
    <label for="firstName" class="form-label-spacing">Last Name:</label>
     <input class="form-control" type="text" id="lastName" placeholder="Last Name">
    <label class="E-Mail form-label-spacing" for="E-Mail">Email:</label>
     <input class="form-control" type="email" id="E-Mail" placeholder="Email">
    <label class="form-label-spacing" for="password">Password:</label>
     <input name="Password"  class="form-control"  type="password" placeholder="Password">
    <div class="form-group">
     <label class="form-label-spacing" for="gender">Gender:</label>
      <div class="radio">
       <label><input type="radio" name="gender" id="gender">Male</label><br/>
       <label><input type="radio" name="gender" id="gender">Female</label>
      </div>
    </div>

         <button type="button"  class="btn btn-default">Sign Up</button>

    </div>
    <div class="col-lg-8 col-md-8"/>
   </div>
  </form>
    </body>
</html>
The new form fields look like the screenshot below in a browser:
As you can see with just a few changes in our markup we can have a professional looking form field in our registration form. Let's examine the code more closely.
The first thing we have to do is enclose the form fields in a "form-group" class.
<div class="form-group form-group-spacing col-lg-4 col-md-4">
form-group-spacing is just a class we created to provide some spacing for the form fields. Then we want to limit the space of the form fields to just four columns on the bootstrap grid system. A grid system is bootstrap's way of defining the layout in a page. Basically it divides the page into twelve columns, with lg = large resolution (large screen), md= medium resolution (medium screen), sm = small resolution (small screen usually mobile devices) . So in our code we tell bootstrap to give us four large columns and four medium columns, usually I just leave the sm settings for bootstrap to handle and define just the lg and md sizes. For more information on the bootstrap grid system go to Bootstrap Grid System.
Then we just add the <label> tag for each form labels: For example for the first name form field we added the code <label for="firstName" class="form-label-spacing">First Name:</label>, the "for" attribute, specify with form field id the label tag is for. Then in the <input class="form-control" type="text" id="firstName" placeholder="First Name"> tag we add the class="form-control" to make the form field pretty, the placeholder is optional, it shows the default text that is displayed to the user. We do this for all the form fields, except for radio button fields.
The radio button fields we create another <div class="form-group"> to provide it's own spacing. We then tell bootstrap that we are dealing with radio buttons in the <div> tag <div class="radio">. Notice how the labeling is different for the label we just have the label on top, and then an opening and closing <label> tags around the actual radio button input fields and no attributes in the <label> tags. This is because the radio button label is already defined with the word "Male" and "Female".
<div class="form-group">
<label class="form-label-spacing" for="gender">Gender:</label>
<div class="radio">
<label><input type="radio" name="gender" id="gender">Male</label><br/>
<label><input type="radio" name="gender" id="gender">Female</label>
</div>
</div>
Then we define the button with the following markup
<button type="button" class="btn btn-default">Sign Up</button>
The markup above just give the button the default button style in bootstrap.
Finally, we tell bootstrap to use up the other eight columns on the page with this tag
<div class="col-lg-8 col-md-8"/>
The reason we specify that we want bootstrap to use the other eight columns is because we don't want to have any weird layouts when the browser is resized. All twelve columns have been defined on the page.
If you look in FireBug you will see that form fields are styled with some pretty fancy CSS styles. But all we had to do was call the CSS class, bootstrap does all the work for us.


Comments
Post a Comment