ASP.NET: Northwind Products Page
I could go on, and on about ASP.NET features and how awesome it is, but most of the time you come to a blog to learn about real world situations. So why not create a web application base on the Northwind database.
Just from looking at the database tables we know that we could divide the web site into two sections. The e-commerce side of the business and then the internal side of the business. So the e-commerce site deals with the products are being offered by the Northwind corporation, and the internal side of the site deals with the sales team and the employees.
So our first task is to create a products page that displays the products for the Northwind web site.
1. Create an empty web application call "Northwind"
2. Add a "Web Form" and call it Default.aspx to the project
3. Click on the "Design" tab in main window of Visual Studio
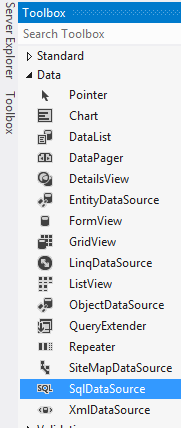
4. Click on the "Toolbox" tab, then expand the "Data" node, then drag the "GridView" data control to the Design surface. The Design Surface is the big window in the middle of Visual Studio.
5. Click on "Toolbox" tab again, this time drag the "SqlDataSource" control to the Design Surface
6. Click on the ">" button next to SqlDataSource1 control, then select "Configure Data Source"
7. Click on the "New Connection" button
8. Select your "Server name", SQL Server should pick up your database server automatically if it's on a local machine, but if it doesn't type in (local) in the "Server name" field.
18. The following into the SELECT statement window
Products ON Categories.CategoryID = Products.CategoryID
Just from looking at the database tables we know that we could divide the web site into two sections. The e-commerce side of the business and then the internal side of the business. So the e-commerce site deals with the products are being offered by the Northwind corporation, and the internal side of the site deals with the sales team and the employees.
So our first task is to create a products page that displays the products for the Northwind web site.
1. Create an empty web application call "Northwind"
2. Add a "Web Form" and call it Default.aspx to the project
3. Click on the "Design" tab in main window of Visual Studio
4. Click on the "Toolbox" tab, then expand the "Data" node, then drag the "GridView" data control to the Design surface. The Design Surface is the big window in the middle of Visual Studio.
5. Click on "Toolbox" tab again, this time drag the "SqlDataSource" control to the Design Surface
6. Click on the ">" button next to SqlDataSource1 control, then select "Configure Data Source"
7. Click on the "New Connection" button
8. Select your "Server name", SQL Server should pick up your database server automatically if it's on a local machine, but if it doesn't type in (local) in the "Server name" field.
9. Click "OK"
10. A new connection has been defined in your web application
11. Click "Next", leave the checkbox check for the option "Yes, save this connection as:", "NorthwindConnectionString"
12. Click "Next"
13. On the "Configure the Select Statement" window select "Specify a custom SQL statement or stored procedure"
14. Click "Next"
15. Click on the "Query Builder" button"
16. On the "Add Table" window select the "Categories" and "Products" table and then click "Add", then click "Close"
17. In "Query Builder" the two tables and their relationships are displayed
SELECT Products.ProductName, Products.UnitPrice, Categories.CategoryName, Categories.Description
FROM Categories INNER JOINProducts ON Categories.CategoryID = Products.CategoryID
19. Click "OK"
20. Click "Next"
21. Click "Finish"
22. Click on the ">" button next to the GridView1 control, and for the "Choose Data Source" dropdown list chose "SqlDataSource1"
23. Right-click on the "Default.aspx" file then select "Set as Start Page"
24. Press F5 to run the page, the GridView will be displayed on the browser page.
This page uses the SqlDataSource data control, in real world situation you will probably never use this data control in a modern application. However, you might run into this data control in older applications that still uses .NET 1.1 or .NET 2.0. It also comes in handy if you have to throw something together quick and dirty like a throw away code or a quick demo.
In this tutorial we added the GridView UI data control and bind it to the SqlDataSource data control. Very simple, it is a good solution if you are not at a stage that you don't need a full blown data access layer like the Entity Framework just yet.


Comments
Post a Comment